> ## Documentation Index
> Fetch the complete documentation index at: https://docs.docswrite.com/llms.txt
> Use this file to discover all available pages before exploring further.
# API Introduction
> Use the Docswrite REST API to programmatically create and update WordPress posts from Google Docs
## Introduction
You can make a `POST` request to the Docswrite API endpoint to create or update blog posts and pages on your WordPress site directly from Google Docs.
You can configure most parameters either in the API request body or directly in the Google Docs document itself.
## How It Works
1. **Create a settings table** in your Google Docs document (optional but recommended)
2. **Share your Google Doc** with "Anyone with the link"
3. **Make a POST request** to your personal Docswrite endpoint
4. **Track the job status** using the returned job ID
First, you need to connect your WordPress site to Docswrite. Once connected,
you'll get a personal API endpoint for making requests.
## Setting Up Parameters in Google Docs
You can include publishing parameters directly in your Google Docs:
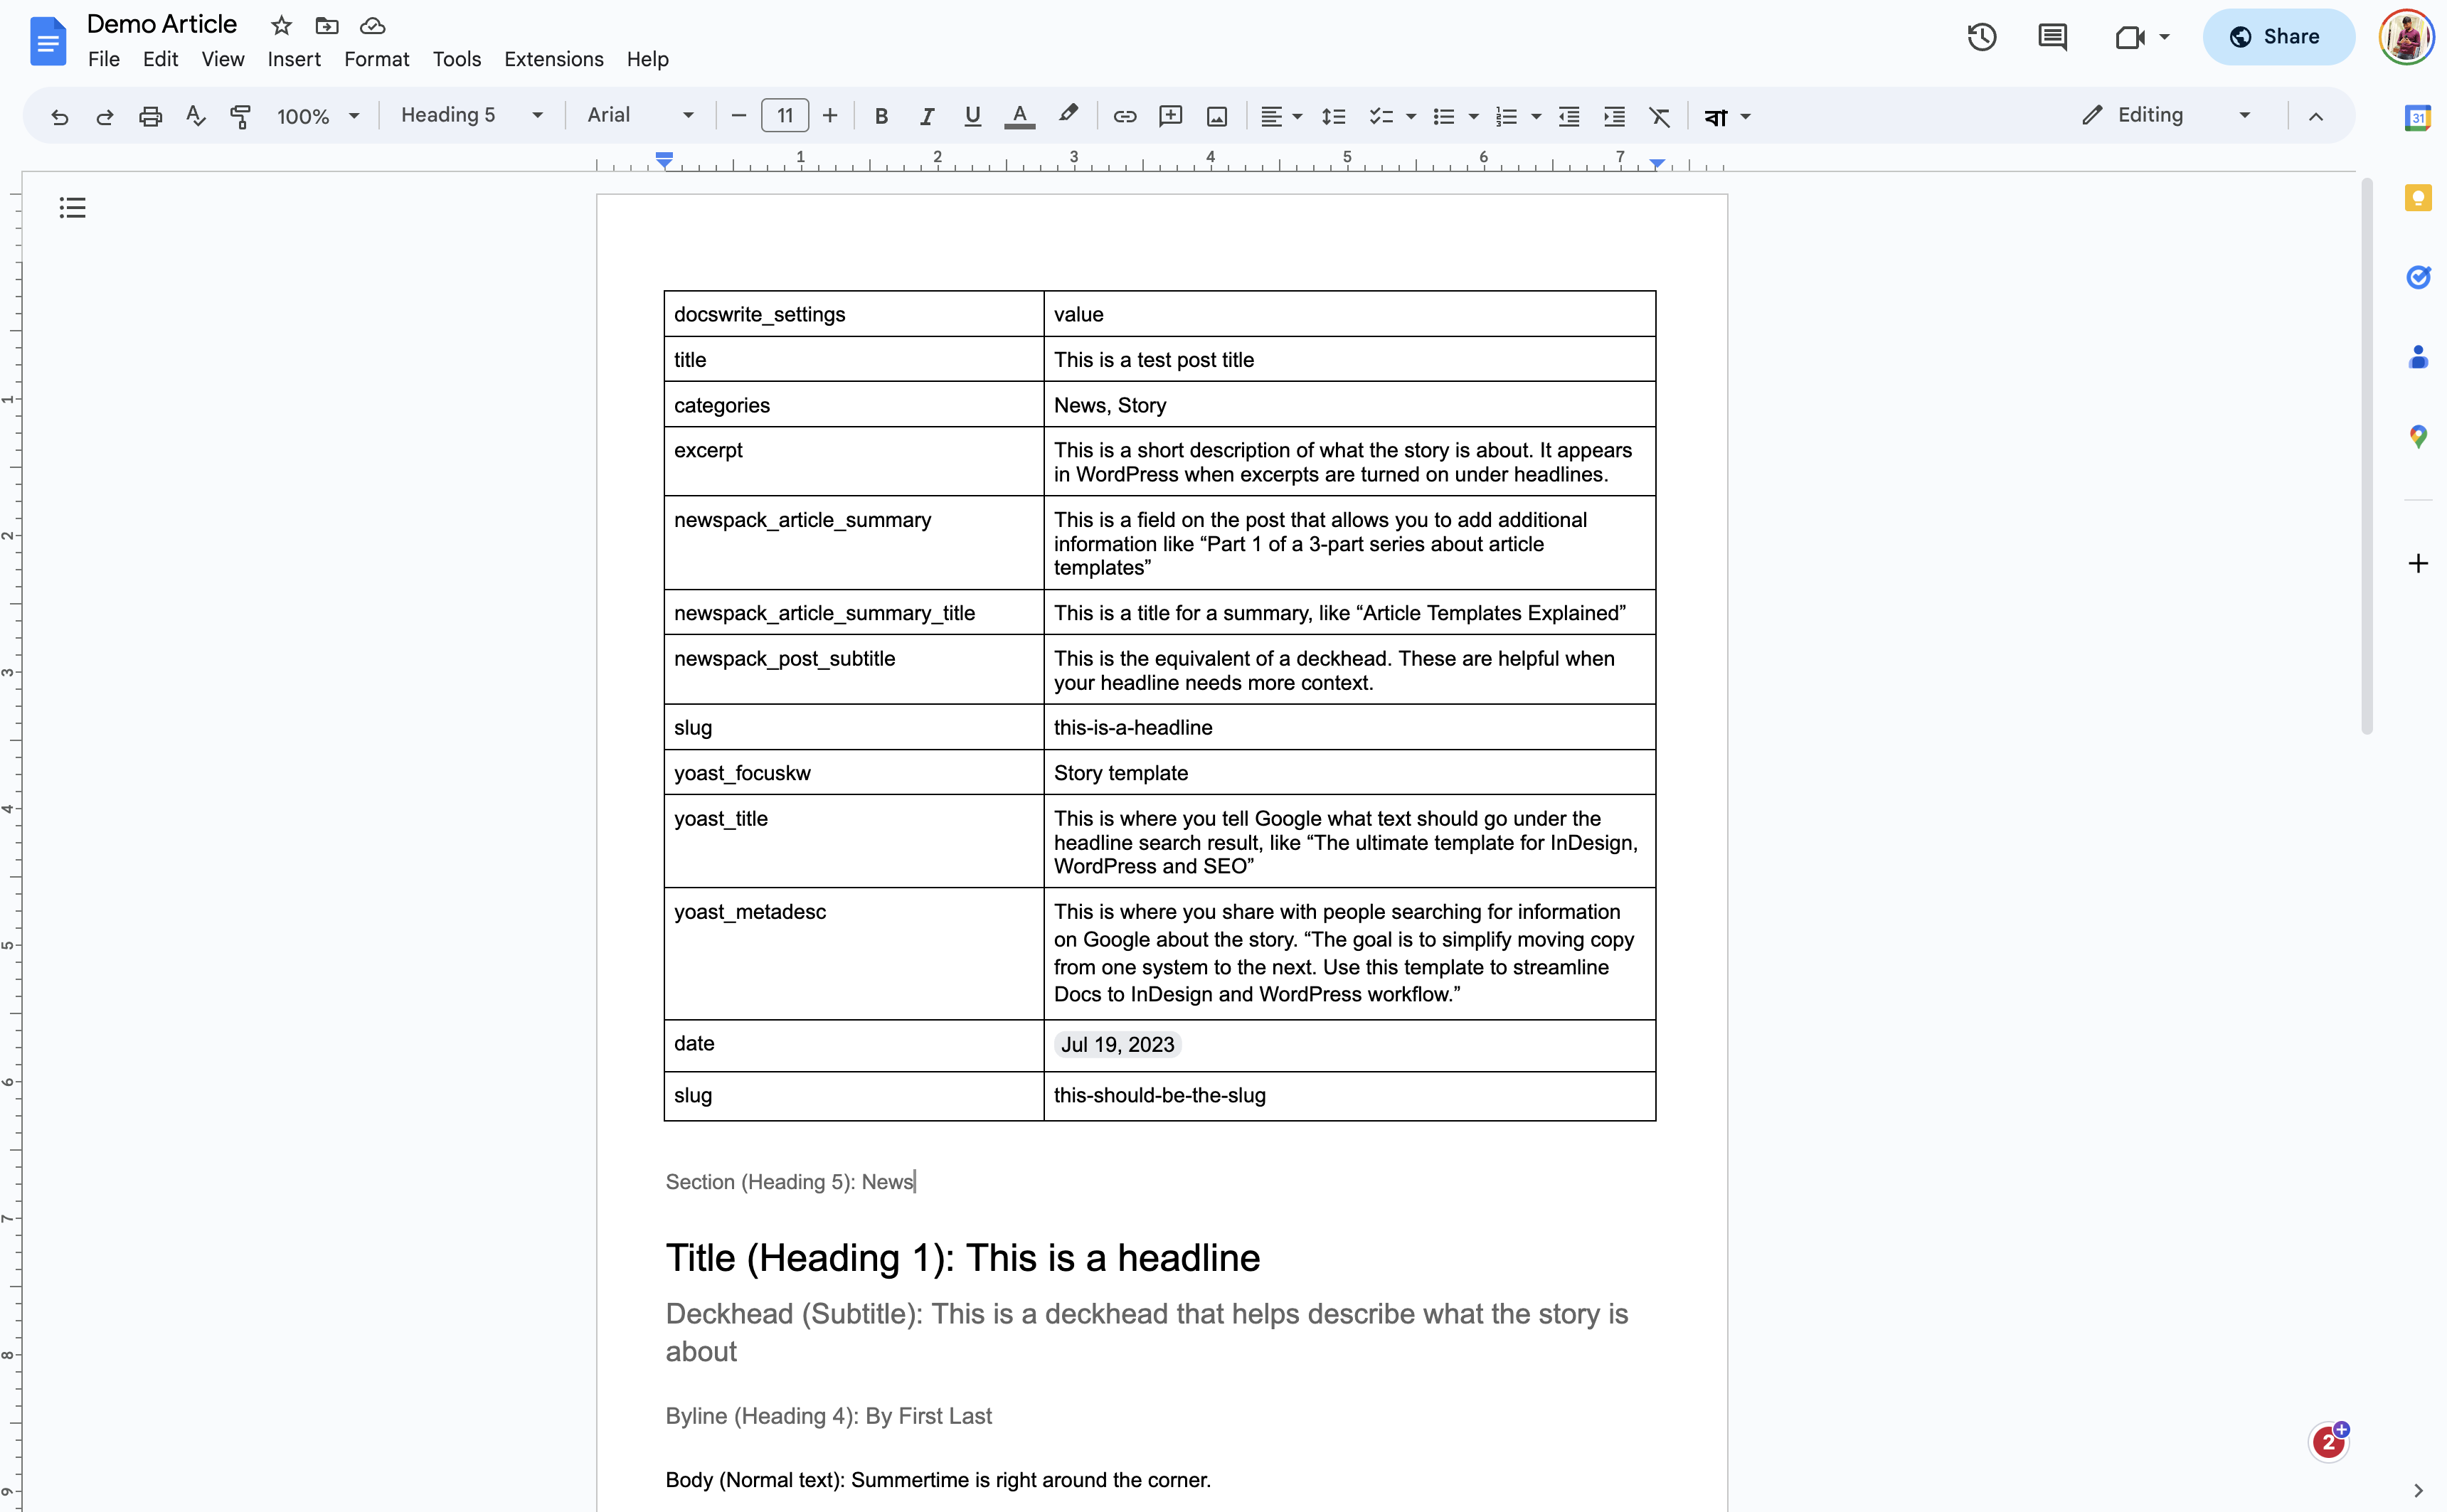
* Create a table in the Google Docs document. It should be **the first table** in the document.
* The table should have **two columns**. The first column should contain the parameter name and the second column should contain the parameter value.
* **The column name should be `docswrite_settings`**. Otherwise, we won't be able to read the table.
For example, you can add a `title` parameter in the Google Docs document itself and it will be used as the title of the blog post.
 [Link to the Google Docs](https://docs.google.com/document/d/1xoQOTl945fGRm_5YrRalZUEa_9U5q8y3r0pploi_360/edit?usp=sharing)
## Getting Your API Endpoint
1. Login to your [Docswrite account](https://docswrite.com/accounts/signin) and go to the settings page.
[Link to the Google Docs](https://docs.google.com/document/d/1xoQOTl945fGRm_5YrRalZUEa_9U5q8y3r0pploi_360/edit?usp=sharing)
## Getting Your API Endpoint
1. Login to your [Docswrite account](https://docswrite.com/accounts/signin) and go to the settings page.
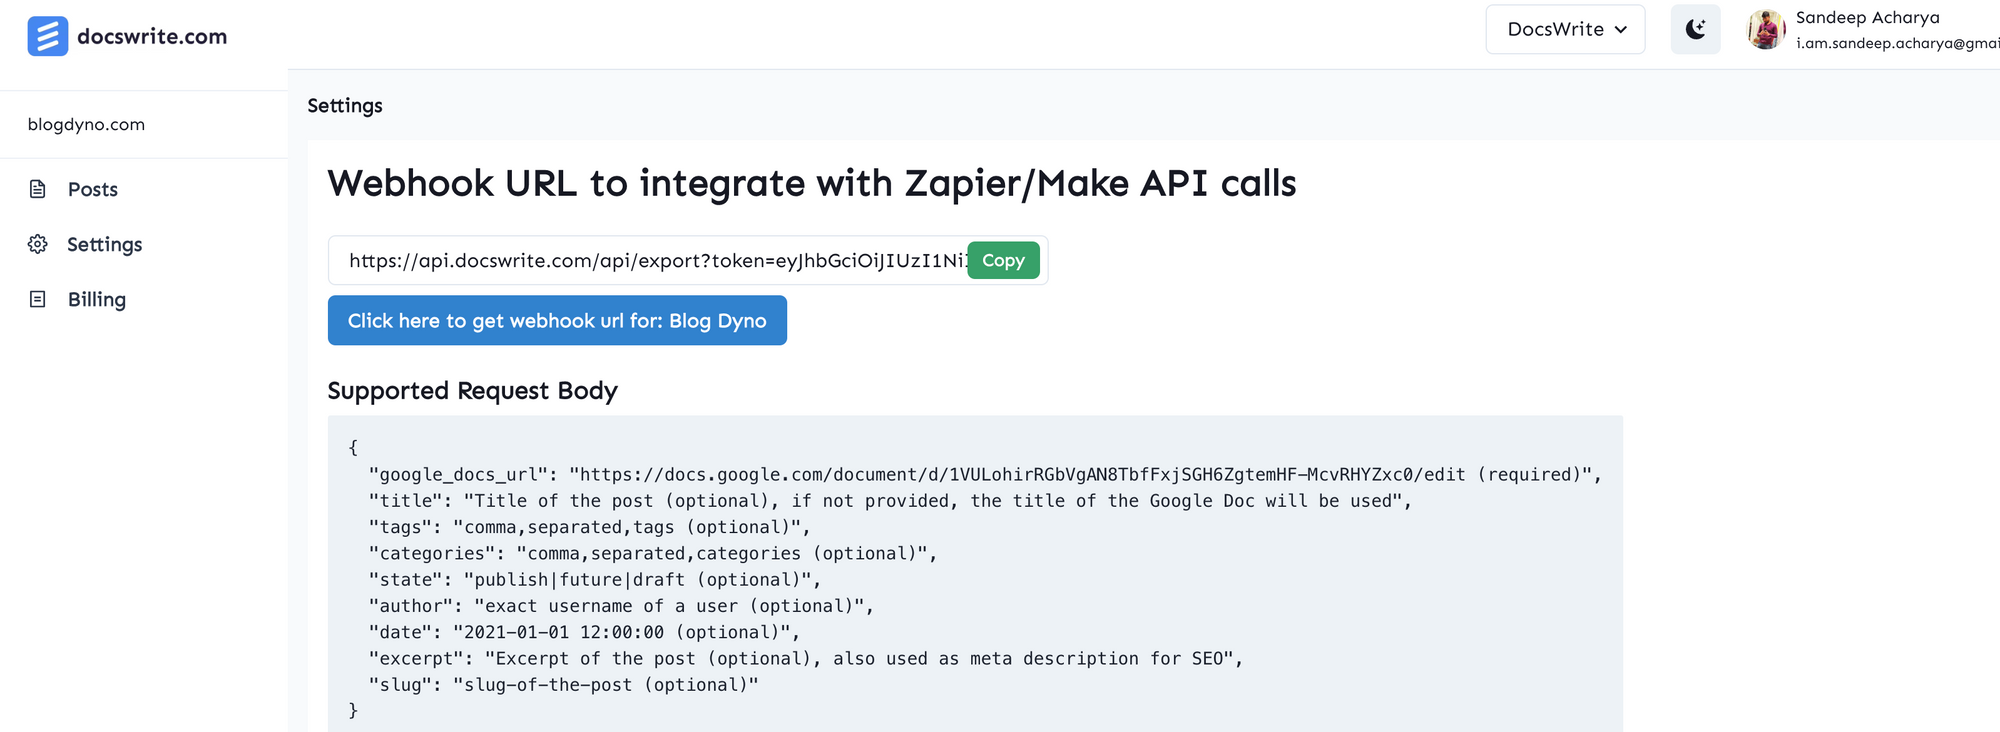 2. Grab the endpoint URL from the Docswrite settings page. It will look something like this:
```
https://api.docswrite.com/api/export?token=xxx
```
## Authentication
Authentication is handled through your personal API token included in the endpoint URL. No additional headers are required for basic API calls.
For job status tracking, you'll need to include your JWT token in the request headers:
```
x-access-token: YOUR_JWT_TOKEN
```
## Rate Limits
The Docswrite API implements reasonable rate limits to ensure service quality:
* **100 requests per minute** for content creation
* **500 requests per minute** for status checking
* **Burst allowance** of up to 200 requests
If you exceed these limits, you'll receive a `429 Too Many Requests` response.
## Error Handling
The API returns standard HTTP status codes:
* `200 OK` - Request successful
* `400 Bad Request` - Invalid parameters or missing required fields
* `401 Unauthorized` - Invalid or missing authentication
* `403 Forbidden` - Access denied to resource
* `404 Not Found` - Resource not found
* `429 Too Many Requests` - Rate limit exceeded
* `500 Internal Server Error` - Server error
## Job Status Tracking
When you create a post using the API, you'll receive a `jobId` in the response that you can use to track the publishing progress.
### Example Response with Job ID
```json theme={null}
{
"error": false,
"message": "Post added to queue",
"data": {
"google_docs_url": "https://docs.google.com/document/d/1aBcDeFg/edit",
"title": "Example Blog Post Title",
"jobId": "job-123"
}
}
```
### Job States
| State | Description |
| ----------- | ------------------------------------------- |
| `waiting` | Job is in the queue waiting to be processed |
| `active` | Job is currently being processed |
| `completed` | Job finished successfully |
| `failed` | Job failed with an error |
| `delayed` | Job is scheduled to run later |
## Complete API Example
Here's a complete example of creating a post and tracking its status:
```bash theme={null}
# 1. Create a post
curl -X POST 'https://api.docswrite.com/api/export?token=YOUR_TOKEN' \
-H 'Content-Type: application/json' \
-d '{
"google_docs_url": "https://docs.google.com/document/d/1aBcDeFg/edit",
"title": "My Blog Post",
"state": "publish"
}'
# Response:
# {
# "error": false,
# "message": "Post added to queue",
# "data": {
# "jobId": "job-123"
# }
# }
# 2. Check job status
curl -X POST 'https://api.docswrite.com/api/job/status' \
-H 'Content-Type: application/json' \
-H 'x-access-token: YOUR_JWT_TOKEN' \
-d '{
"jobId": "job-123",
"queueType": "post"
}'
```
## Next Steps
Learn how to create new WordPress posts
Track the status of your publishing jobs
Complete list of supported parameters
Coming soon: Official SDKs for popular languages
2. Grab the endpoint URL from the Docswrite settings page. It will look something like this:
```
https://api.docswrite.com/api/export?token=xxx
```
## Authentication
Authentication is handled through your personal API token included in the endpoint URL. No additional headers are required for basic API calls.
For job status tracking, you'll need to include your JWT token in the request headers:
```
x-access-token: YOUR_JWT_TOKEN
```
## Rate Limits
The Docswrite API implements reasonable rate limits to ensure service quality:
* **100 requests per minute** for content creation
* **500 requests per minute** for status checking
* **Burst allowance** of up to 200 requests
If you exceed these limits, you'll receive a `429 Too Many Requests` response.
## Error Handling
The API returns standard HTTP status codes:
* `200 OK` - Request successful
* `400 Bad Request` - Invalid parameters or missing required fields
* `401 Unauthorized` - Invalid or missing authentication
* `403 Forbidden` - Access denied to resource
* `404 Not Found` - Resource not found
* `429 Too Many Requests` - Rate limit exceeded
* `500 Internal Server Error` - Server error
## Job Status Tracking
When you create a post using the API, you'll receive a `jobId` in the response that you can use to track the publishing progress.
### Example Response with Job ID
```json theme={null}
{
"error": false,
"message": "Post added to queue",
"data": {
"google_docs_url": "https://docs.google.com/document/d/1aBcDeFg/edit",
"title": "Example Blog Post Title",
"jobId": "job-123"
}
}
```
### Job States
| State | Description |
| ----------- | ------------------------------------------- |
| `waiting` | Job is in the queue waiting to be processed |
| `active` | Job is currently being processed |
| `completed` | Job finished successfully |
| `failed` | Job failed with an error |
| `delayed` | Job is scheduled to run later |
## Complete API Example
Here's a complete example of creating a post and tracking its status:
```bash theme={null}
# 1. Create a post
curl -X POST 'https://api.docswrite.com/api/export?token=YOUR_TOKEN' \
-H 'Content-Type: application/json' \
-d '{
"google_docs_url": "https://docs.google.com/document/d/1aBcDeFg/edit",
"title": "My Blog Post",
"state": "publish"
}'
# Response:
# {
# "error": false,
# "message": "Post added to queue",
# "data": {
# "jobId": "job-123"
# }
# }
# 2. Check job status
curl -X POST 'https://api.docswrite.com/api/job/status' \
-H 'Content-Type: application/json' \
-H 'x-access-token: YOUR_JWT_TOKEN' \
-d '{
"jobId": "job-123",
"queueType": "post"
}'
```
## Next Steps
Learn how to create new WordPress posts
Track the status of your publishing jobs
Complete list of supported parameters
Coming soon: Official SDKs for popular languages